Showing posts with label remodel. Show all posts

Tuesday, July 5, 2016

Guest Room/Play Room Makeover


One of the main reasons we moved was to get a guest room, but the thought of having a room only used a couple times a year seemed wasteful to me!  (This was the master bedroom for the previous owners---we are making an old game room into our Master).  To make this space work for us we removed the two walk-in closets and created built-in bunk beds and moved the door coming into the room to allowing an old hall closet to become the play room closet. The thing I love about this room is that we are able to sleep six, have a space for watching TV and playing video games, and there is still plenty of floor space to kid around.  Our kids are in here everyday and it's the perfect slumber party spot.


Here's a break down of what it cost to decorate the space. Of course we removed walls, re-sheetrocked the entire ceiling, new windows, doors, trim, paint, and flooring, but this is just the pretty stuff. I figured we spent around $2,500.00 to finish out the room.  Most of these items were purchased for the old house or from silent auctions and estate sales.


Shopping List
Dresser………………………………………………………………………………. $1,299
Red Door w/$500 gift card
Sofa/Sofa pillows/Chair/coffee table........................................…… $260
Renesting silent auction
Rattan accent chair…............................................................………………. $28
Estate Sale
Garden stool………………...………………………………………………………….$60
Southeastern Salvage
Bunk Lights………………………………………….……………………………..$11 ea.
Lowes
Comforters/Bed pillows………………...…………………………..... $9-$29 ea.
Stein mart
Bunk Mattresses…………………………………………………………………$70 ea.
Walmart
Vintage dog pillow………………………………………………………………….free
Husband’s grandmother made it
Stacked chests end table...........................................................................free
Found in husband’s grandfathers garage
Bunk Bed and Toy Drawers Material……………………………………..$250
Wall bookcase……………………………………………………………………..…$199
Pottery Barn
Quartz chunk…………………………………………………………………………...$35
Bob’s Rock Shoppe in Dequeen AR
Meredith Piper print and frame………………………………………………$60
Philadelphia Center silent auction and Hobby Lobby with ½ off coupon
State Plates…………………………………………………………………....$1-$15ea.
Estate Sale
Prints/frames/clock/Baskets……$8 – 25ea


This dresser works as the perfect hiding space for art supplies and video games.
Not only do these chests act as an end table but that are great hidden storage for rarely used items.
Perfect small coffee table for playing board games.

OK, so I cleaned up, most of the time this is covered in toys.

Collection of vintage state plates from all the places we've been displayed above an old
Pottery Barn wall mounted bookcase.


This puppy pillow was made by my husband's grandmother and part of his baby bedding.

The two pullout drawers under the beds are loaded down with Lego pieces.  My husband and I made the bunks and drawers all while not killing each other (he did most of the work).

I couldn't believe the steal I got from the Renesting Silent Auction last year.  Local designers create room setting that are then put up on the auction block.  I won Myron Griffing (with Space: Interior)'s grouping which included the sofa (from the old Joey Guin Salon) coffee table, green club chair, and lamp base. Plus I got an additional 2 end tables, accessories and art that I didn't use in this room.


-Angie


Thursday, January 29, 2015

Coffee Bar

This 2014 kitchen remodel included the cutest Coffee Bar---complete with a Miele Espresso maker, Grohe Blue Chill water filter, dishwasher, and fridge drawers!
#RedRiverRemodelers
Follow us on Instagram! @RedRiverRemodelers

Thursday, January 15, 2015

Pantone's 2015 Color of the Year!


MARSALA! Pantone's 2015 Color of the Year! Whether it be as a contrast or a complement, an anchor or an accent, or even as a backdrop, MARSALA is everywhere this year! How will you use marsala in your home? 

Wednesday, November 26, 2014

Mid-Century Modern Remodel - Red River Remodelers' new office Part 3!

Ok, I'm in trouble... I didn't post this last Friday! But, I promise it was worth the wait! I know I've roped you into this office remodel, and if you get excited as easily as I do, then you'll love what's coming! Remember this picture from the last blog?
Well... here's what we did with those nice pink cinderblock walls and aluminum windows...
Yeah, holy guacamole! That's exactly what I said when I saw the old pictures! Replacing the window with a more sleek, clean line picture window, Red River Remodelers really ties the kitchenette in with the conference room and the oversized window showcased in there.  The cabinets are Oak Silas from W.W. Wood Products, and they frame the space out perfectly. Sean & Angie made a conscious effort not to extend the cabinets to the ceiling, as to not take away from those amazing beams! 

I tell you one thing, I am in LOVE with the tile... It's Nemo Atom in Eggshell. Here's the kicker: they're different styles! You can order it "In", "Out", or "Flat." We mixed it up! I love the randomness and the texture it brings to the small space.
Now, I know I get a little excited... and I try to tone it down, but Angie killed it with these lights!! The Urban Renewal Antique Brass Sconce by Feiss is super versatile; follow the link to Lamps Plus and see the picture they have on there. You can turn them! They can be vertical or horizontal! Love the vintage amazingness they bring to the office.

This next little bit you've seen before... it's what I tempted you with weeks ago! Our bathroom! Sarah may have moved to Austin, but she will always live on in this bathroom with this freaking bada** wall she designed!
Oh, I almost forgot! Would you like to see what it used to look like?
I think that might be enough to hold you over for Thanksgiving :) Monday, I will get you Sean and Angie's offices!! AHH! Guess who's office this used to be...


Friday, November 7, 2014

Mid-Century Modern Remodel - Red River Remodeler's new office!

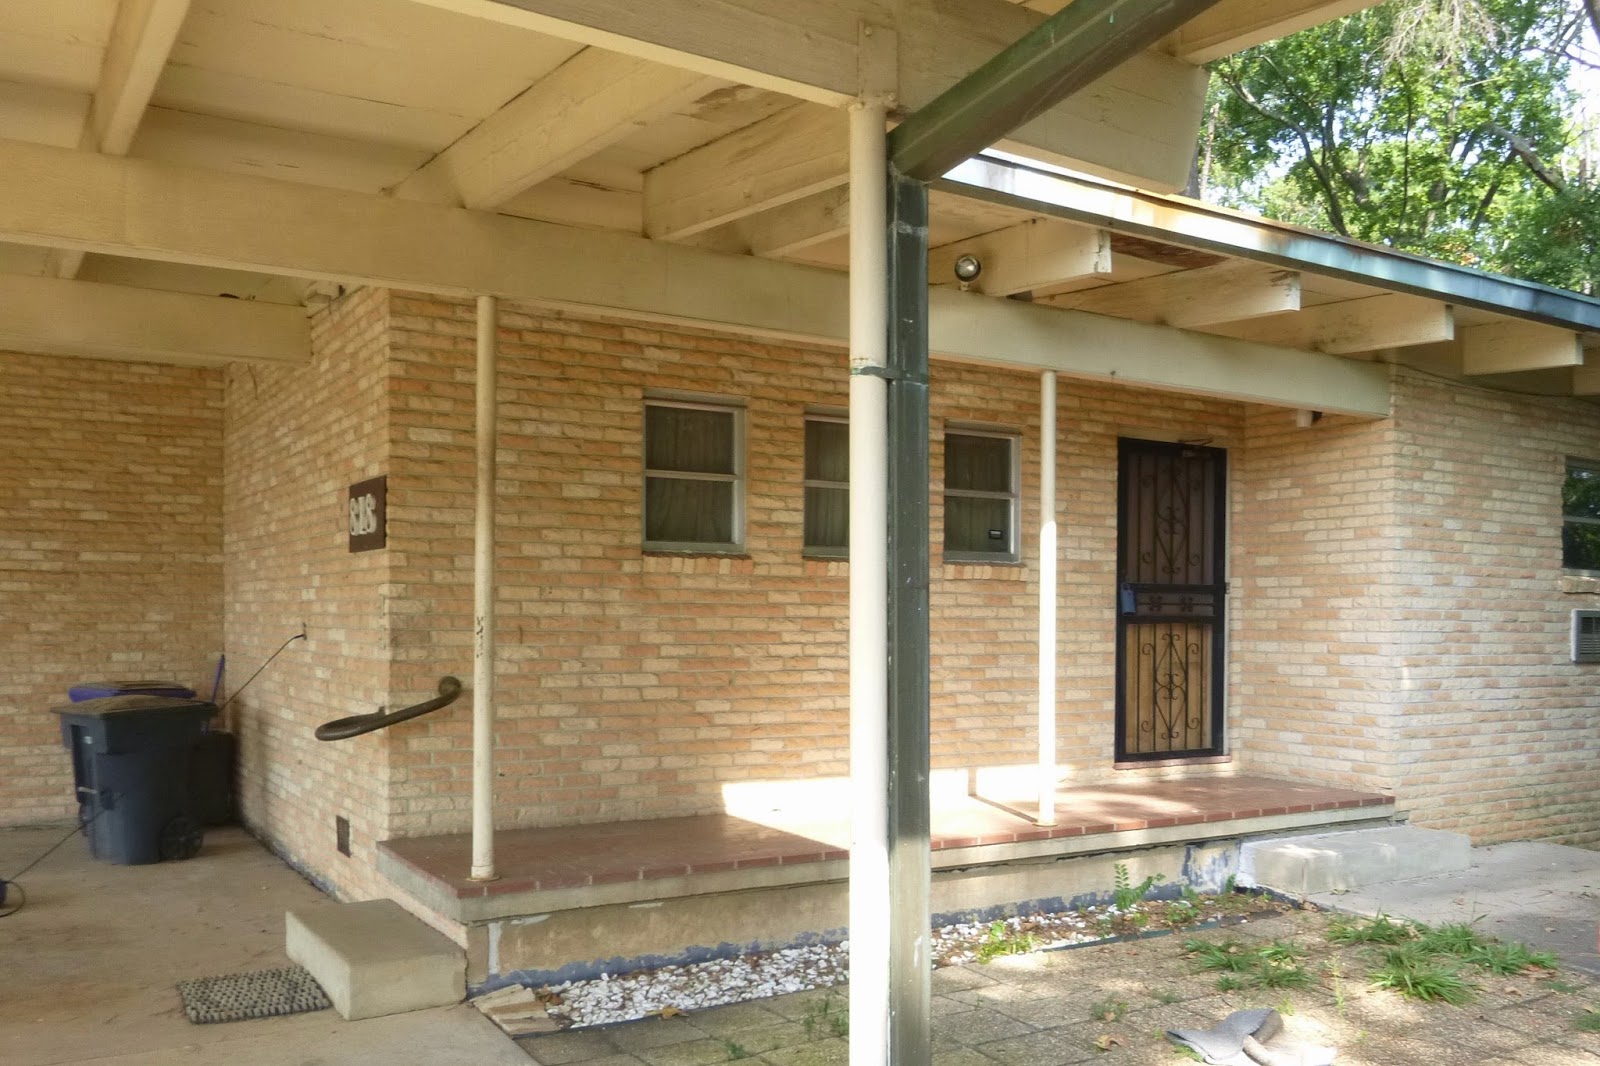
So, I know it's been two weeks since my last post, and I know you're all DYING to see the rest of the office since I teased you with the bathroom wall! But here's the thing, one of my favorite things about blogs are that they usually are pretty short. They give you random amazingness without having to spend your entire afternoon getting it. So, today, I'm going to introduce you to our new office location with the exterior transformation. And personally, the full remodel was so freaking amazing, I could barely take it all in myself, so I'll ease you in as not to give anyone a heart attack! :)

Just a quick background about 818 Montrose Drive:

It was built in 1958 by Dr. Howard & Stella Chapman as their residence, along with his podiatrist office next door, now the location of Dr. Robert A. Palmer, Jr., DDS. Ah, the joys of being able to walk to work every morning!

The entire house had mid-century modern cinder-block walls throughout the interior, and it also had a full basement, which was really unique for the Shreveport area.

It had been vacant since 2011, so a full remodel would be in order! Red River Remodelers main goal was to create a functional office without losing the essence of this beautifully designed mid-century modern home. 

The most important factors: showcase the magnificent beams that run throughout the entire house, highlight the new custom front doors, and make sure the carport stays a predominant feature of the design. 

Today, I show you how Red River Remodelers transformed the exterior without losing the essence of that amazing mid-century modern slanted flat roof.
Wow, right? We repaired and painted the soffit, fascia, and trim Sherwin Williams 7048 Urbane Bronze, and added custom signage made from sheet metal. It's finished with an automotive clear-coat and overlaying white acrylic.
For ADA purposes, we added a ramp and railing, which really envelops the newly designed courtyard, creating a crisp, geometric space. We wanted to have the option of housing another tenant, so we created two entryways. 
These doors were custom designed by Angie and ordered locally by Allen Millwork.  We also installed new windows and added two Double Box outdoor lights with Edison light bulbs by Possini to polish off the entry. 
I know you can see that new picture window we installed... It will come in to play next blog! Can't wait to show you what we did with this living room and white brick fireplace!!


Friday, October 17, 2014

The Wild Wonders a Wall Can Do

Fall is here! It's getting cooler and giving me the itch to do some DIY! Sometimes you don't have the time and money to do a full "knock down the walls" remodel, but I've got some simple ideas you can do yourself! So throw on a long-sleeve shirt and some comfy jeans, and pull out those paint brushes!

First, I want to give you a little update on us! Red River Remodelers recently relocated our office to 818 Montrose Dr., just across the street from Superior Bar & Grill. We found this amazing mid-century modern home and let our creative juices flow! We want to get the finishing touches done before debuting it in a full blog, but you know I like to tease you, so I have included a piece of it today ;)

Red River Remodelers wants to give you something you can make into a weekend project. One wall... that's it. That's all you have to tackle to make a huge difference in your home. Now, some of us are a little adventurous and will end up doing the whole room, but all I'm asking you to do is just one wall. 

Now, here's the fun stuff! This is our bathroom at our office! Three of the walls are finished in Valspar Graphite, and our accent wall is covered in Emser Tile Confetti Penny Round Mosaics. The freaking awesome Sarah Reuther found this and told Angie we HAD to have it! Can you blame her? Thanks Sarah for bringing this into our lives!


I was so excited about doing some DIY, I started searching some blogs and found some amazing and simple projects to share with you! This first one doesn't even take up an entire wall! By the way, anytime you want some inspiration, go to apartmenttherapy, this is where I found Maura's project! All she used was a few samples of paint (all from the same paint swatch) and some tape!


This next project is SUPER EASY! Also found on apartmenttherapy, Alicia just bought some simple pre-painted white wood, cut a few pieces, hot glued them to make diamonds, and then used 3M Command Strips to mount them! Totally great idea if you're just renting!


Another blog I love to find DIY things on is Cozy.Cottage.Cute. Sarah had been dying to use a stencil, but didn't want it to be too girly for her little boy's nursery. She ended up using Royal Design Studio's Endless Circles Lattice Moroccan Stencil which had been featured in Better Homes and Gardens. They have tons of different patterns, and the cool thing about a stencil is that you can go bold with your colors, or keep it neutral like Sarah did here and still make a statement. I've been spending way too much time on their website looking at stencils! I think my next project will definitely involve one!


For you rustic folks, this is one of my favorite DIY projects... I love getting my hands dirty, and this really gives you an opportunity! Mandy Jean Chic created this super awesome pallet wall in her master bath water closet. It took a little figuring, a little hard labor, and a lot of love, but this space transformed into such a beautiful little rustic toilet room. 


This last DIY is a little more intense... I just fell upon it while mindlessly perusing Pinterest and stopped cold! I am a little bit of a sucker when it comes to black and white.  I don't do it on purpose, I can't help it, but I love it.  It's classy, it's funky, it's whatever you want it to be!

Now, I know some of you are looking at this and thinking, what are trying to sign me up for crazy woman! I know you might not believe me, but this isn't wallpaper! Shauna hand-painted this wall pattern! If you've followed us and read our Pattern Party blog, you will see that I'm continuing Sarah's love for pattern :)

I found this on Shauna's Beautiful Matters blog.  Her finished look gave the illusion of modern wallpaper, without all the hassle that comes with it. I know you're probably thinking, Callie, you said ONE wall... well, I'm getting excited :) You've got to follow the link on the pictures and check out all her other pictures of the process.  It's amazing! 


This just goes to show that a lot of excitement, a little bit of time, and one wall can completely transform your room from drab to fab!  Get excited! Tackle a wall; heck, tackle an entire hallway!  Go grab some supplies and get to painting! Post pictures of your before and after on our facebook page!

Don't forget to follow us on Twitter and Instagram, and like us on Facebook to keep up with our latest remodels!